The Arts Of Nail

Showing posts with label nail art. Show all posts

Thursday, December 9, 2010

So nice!

Well i this design is so nice! i like it. By adding the gems can really enhance your finger nails.. glitter power can do the trick too =)
ahh.... this design is simple and easy to do... but i think your nails must be longer so that it will look better with 3 colors?


source: kakimoto-arms

Pretty flower in 4 easy steps

Here's one of my favorite and easy to do nail arts. Simple and girlish ;)


1: Polish the nail with pink color.
 
2. Apply the top portion of the nail with glitter.
 
3. Form five 3-D white flower petals with acrylic (you can try using white nail polish and use the nail art brush to draw it too)
 
4. Add rhinestones to the center of the flower and below.

Source: nailsmag

Japanese nailart

Anyone fancy winnie the pooh on your nails?


Glow in the dark!


How to do nail marbling effect

Marbling Prep

In this close-up on marbling we are going to take a look at marbling on tips or directly onto the natural nail.

For designing on tips make sure you prepare a skewer or chop stick by wrapping double sided tape around one end, this will be used to attach the tip to. Then apply a base coat to the tip.

For work on a natural nail be sure to have a cotton bud and nail polish remover ready.

Prepare the natural nail as per usual, wipe the surface of the nail with alcohol to remove oil and debris, then apply a base coat.

Timing is critical with marbling so being fully prepared is a must.

Nail polish hardens quickly on the water surface so as part of your preparation be sure to have all the bottles you are planning to use open and ready to go.


A~G: Fill a cup or glass with water, almost to the lip -90% full. Add the colors of your choice by placing each drop gently onto the surface of the water. Nail polish is an important element in marbling.

The nail polish should be of good quality and of a liquid even consistency. Poorer quality polish of inconsistent texture will not result in the desired effect.

H~O: Use a pin or needle, dragging it from one edge to the other to create the desired look. Experiment, have fun!

P: Insert the nail or tip into the water.

Q: Remove the excess nail polish while the tip is submerged. This is key to the success of this type of marbling.

R: Once the rough edges have been cleaned remove the tip from the water.

FOR THE NATURAL NAIL-Remove any excess polish from the surrounding skin using a cotton bud dipped in nail polish remover

S: Apply a top coat.

FOR THE NATURAL NAIL-Apply a top coat, wash the hand, then apply an essential oil moisturizer to the skin to prevent drying.

Another thing I can add is avoid quick drying nail polish and while it is best to be in a well ventilated area when working with nail polish, a windy environment will cause the nail polish to dry too quickly. Experiment with your work environment to find the optimum spot.

Nail art photo

Hi all~

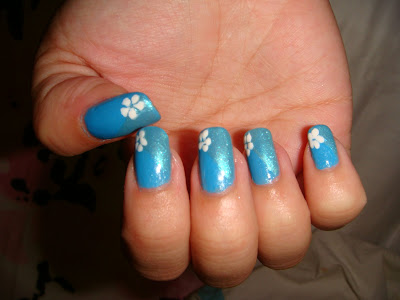
this is my first time showing my nails! haha.. well, i'm not a professional. This is my humble creation. hehee.. Please feel free to comment. Coz if its ugly, i can quickly go and wipe it off. LOL


Taken with Flash light.
Colors used:
Base: China Glaze Caribbean Blue
CG-80874
SGD$8.50
Slanted blue: OPI Sea Ya Later, Sailor!
OP-NLD24
SGD$11
White flower: OPI Alpine snow
OP-NLL00
SGD$11


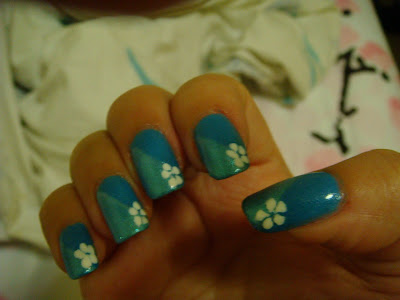
Taken Without Flash

Colors used:
Base: 2 coats OPI Kiss on the Chic
OP-NLH31
SGD$11
2nd color over it:
OPI Princesses Rule!
OP-NLR44
SGD$11
Q: Anyway for the finger nails, how to apply 2 tones?
A: Apply the base on the whole nail first. Then the 2nd color try to draw a line 45 degree over and color it. Do take note of the 2nd color u want to sweep across. If you are doing a light and dark color, use the light one as base and dark over it. Coz if u do the other way round, you'll never see the light color over the dark one.
Now it's your turn to try this! Mix and match your favourite colors =)

Tuesday, August 3, 2010

Fimo Nail Art Sticks / Fimo Canes spree #1

Hi Ladies!

Check out these Fimo sticks/canes the Hottest Nail Art Accessories For Nail Decoration! Very cute and easy to use. Tired of drawing nail art? Wish that your nails are as pretty as others? This is a cheap and easy way to design your nails. Comes in many many designs. Just cut in a thin slice and paste it on your nails (with a nail glue or with clear top coat).


DSC00866 

  • Easy DIY your beautiful nail
  • Can be worn on face and body
  • 100 canes, 100 different designs
  • Each cane is about 5cm long and can be cutted into 100 slices
  • Diameter: 5mm
  • You can cut the canes slice into desirable thickness to suit your nail art design
  • A lot of designs including flowers, fruits, animals, butterflies, stars, cute figures, etc.

  • Great for nail art decoration with nail polish, UV builder gel, acrylic nails, etc.

    Fimo nail art

    Price:

    1 stick: $1.50 (you can request for the type of design – eg: Fruits/Flowers/butterfly/misc)

    5 sticks: $6.50 (assorted)

    10 sticks: $10 (assorted)

    *All are assorted unique designs. You may request the type of designs you like but no guarantee.

    Currently i’ve ready stocks but not many. First come first serve.


    IInternet Banking account:
    POSB SAVINGS 157-03577-0
    UOB Savings 128-192-133-4
    Internet banking or ATM transfers only. (no inter-bank transfer) Must be from the same bank.
    Transfer via: ATM /IB(nick)
    Amount:
    Date:

    Method of collection:
    Normal/Registered postage

    normal post: $0.50 (regardless of quantity)

    For registered, please top up extra $2.24 **Highly Recommended**

    (I will not be responsible if items are damage after i've post out due to poor handling by the postman. I will ensure that all items are in good condition before sending out. I will also not be responsible if the mail went missing for normal postage )

    Pls email your orders and enquiries to estella85@yahoo.com
    Thank you for your support!

  • Fimo Nail Art Sticks / Fimo Canes spree #1

    Hi Ladies!
    Check out these Fimo sticks/canes the Hottest Nail Art Accessories For Nail Decoration! Very cute and easy to use. Tired of drawing nail art? Wish that your nails are as pretty as others? This is a cheap and easy way to design your nails. Comes in many many designs. Just cut in a thin slice and paste it on your nails (with a nail glue or with clear top coat).

  • View Fimo Nail Art Sticks! Must have!


  • Thursday, June 17, 2010

    Nail Art: Grass in the Shade

    Hi everyone! It's a simple nail art that I did, and I love how it turned out! I am thinking of doing variations on the design if you all like it. All I used was Sally Hansen Opulent Cloud and Art Deco Black. I just tried to make as straight of lines as I possibly could, it looks almost oriental to me. What do you all think, do you like it half as much as I do?

    Friday, June 11, 2010

    Nail Art: Seaweed or Morse Code?


    Hi everyone! I was really inspired by a post by The Daily Nail a couple of weeks ago and I wanted to share what I created. I can't decided if it looks like seaweed or morse code.What do you think? I used China Glaze Metallic Muse as the base color and Art Deco Bright Green as the stripes. Please excuse the chipping and horrendous cuticles; it's been a long week. Do you like it?

    Tuesday, June 1, 2010

    Nail Art: Pink Sky and Gold Stars

    Hey everyone! Even though the weather here has been kinda crappy in the past week (snow and rain, even though it should be much warmer), I still want to be able to wear my bright colors and glitter, so I did! I used Essie Forget Me Nots and Art Deco Gold Glitter. This is what I ended up coming up with. I did the stripes on the thumb first and then decided that I wanted to do swoops of glitter on the fingers. It looks a little strange, but I guess like it. I haven't done my nails in well over a month, so I need to get used to doing them again. Maybe it's time to break out the Konading kit, because this is a little sad. I know that I can do better than this, but I need to get back into practice lol! Thank you to everyone who left comments on yesterday's posts, it is great to know that a lot of you are excited that I am back and I am really excited to be back. Have an awesome day everyone!

    Thursday, April 29, 2010

    Nail Art: Neon Stripes!

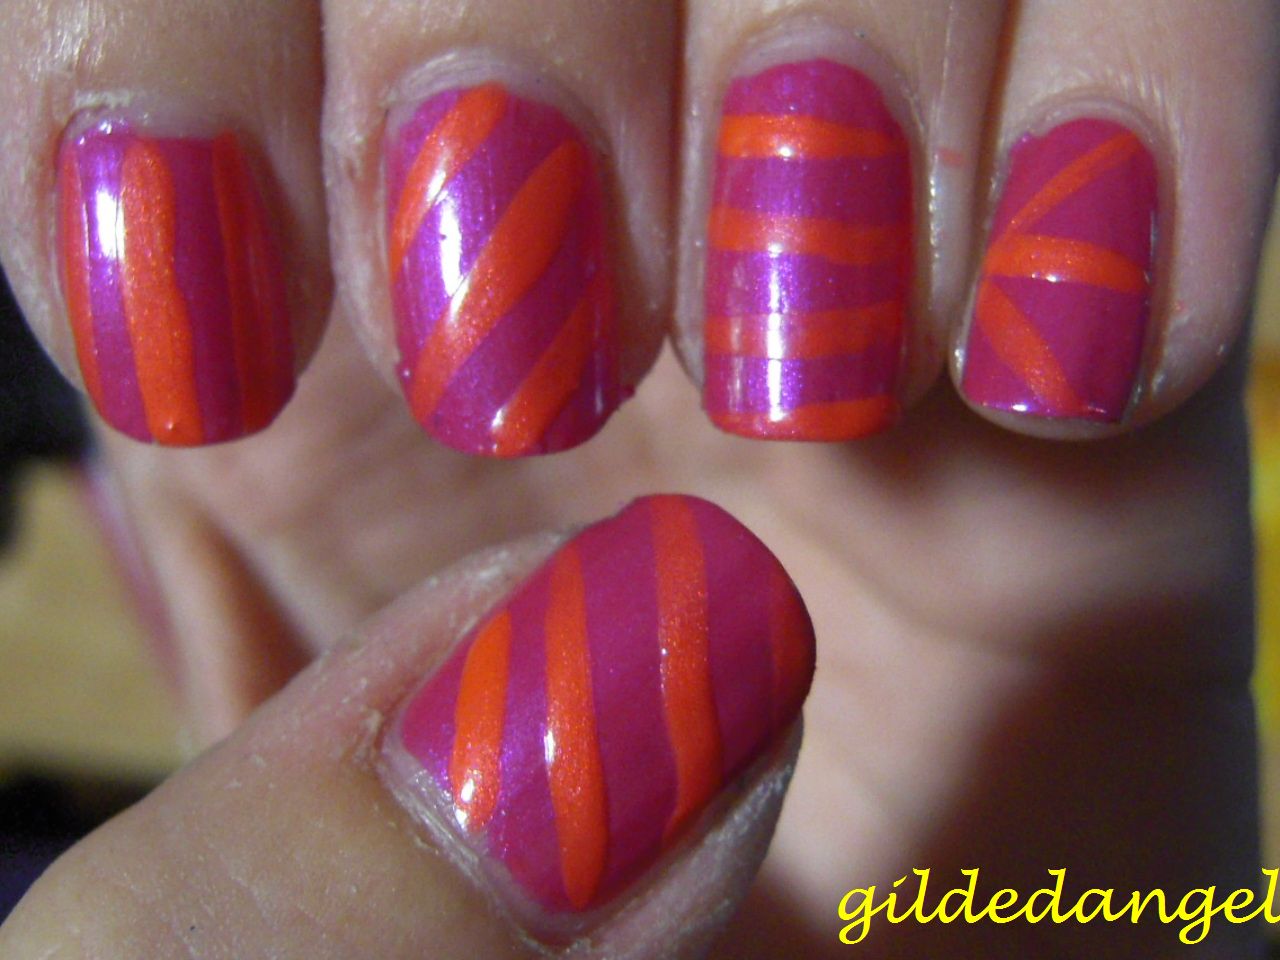
    Hi everyone, today I actually have a manicure for you, yay! Now in case you don't know, it is freaking snowing here again. In fact it is going to snow all week. So to will the bad weather away, I decided on some brighter nails. Now please ignore the horrifying cuticles, it's finals time and I am a chronic cuticle biter. And please ignore the indoor picture because the weather outside is terrible and I can't get god lighting. :( Do you like the new nail shape though? I am not really sure about rounder nails yet, we'll see. I used Sinful Colors Jamboree and Art Deco Bright Orange. I just did stripes, but I like how I varied the stripes. Can you tell I ran out of ideas when I got to my pinky lol? What do you think?

    Tuesday, April 13, 2010

    Nail Art: 80's Night!

    Hi everyone! Today I am bringing you a fun manicure. I was actually just playing around with my polish and I kind of stumbled upon this, and I really like it! It totally reminds me of the 80's. Although I never personally experienced the 80's I sure love the neons and glitter that were quite popular during that time. I used China Glaze Flyin' High, Art Deco Intense Pink, and Art Deco Gold Glitter for this mani; does it remind you of the 80's too?

    Sunday, April 11, 2010

    Nail Art: Pink Palm Leaves!

    Hi everyone! It's a quick post today, I am on my way home from my conference, which was really fun! So this is China Glaze Re-fresh Mint and the stripes are Art Deco Baby Pink, I really love how it turned out, it looks like Pink palm leaves! I was very pleased with my placement with the stripes, I think that I might be getting better at using them! I love the pastels too, it reminds me of spring! What do you think?

    Monday, April 5, 2010

    Nail Art: Pink and Gold Plaid

    Hi everyone! Today I am sharing a fun manicure that I did. I was in a nail art mood and I wanted to break out my Art Deco polishes. I did this using Wet 'n Wild Shield, and Art Deco polishes in Baby Pink and Intense Pink. I was surprised at how straight I managed to get the lines to be, as I have pretty shaky hands. I got a lot of comments and compliments about this design when I wore it to class. Do you like it too?

    Thursday, March 18, 2010

    Nail Art: Purple and Polka Dotted!

    Hi everyone! Today I am bringing you something more fun! This is Parlez-Vous OPI and Chi Chi Cyber Vixen for the dots. I did use a dotting tool, there is no way that I could freehand that! I thought that this was a fun one to wear and I got several compliments on it, so yay! Do you like it too?

    Tuesday, March 16, 2010

    St. Patrick's Day French

    Hi everyone! Today I am doing a St. Patty's Day inspired mani, it is just a green french lol! Nothing too special, but I love St. Patrick's Day so I had to do a couple of manicures to celebrate! I used OPI Here Today Aragon Tomorrow, OPI Green-wich Village, and Art Deco Gold Glitter. Do you like it? Are you doing anything fun for tomorrow?

    So that you are all aware, I (yet again) am going to temporarly stop commenting on other blogs, but I will go back and read/comment on them probably Friday or Saturday. I have a midterm on Wednesday afternoon and 2 more midterms early Thursday morning, and then I have to pack to go home. So I will catch up in the airport lol! I will still be viewing the comments on this blog and answering any questions though. I will also be on twitter once in awhile to keep up, so feel free to tweet me if you would like! :)

    Saturday, March 6, 2010

    Nail Art: Alice In Wonderland Manicure!

    Hi everyone! Late tonight I am going to go see Alice in Wonderland in IMax 3D, I am so excited! I have never seen a movie on opening weekend much less in an IMax theatre. In celebration, I decided that I needed to do a special manicure just for the movie, thankfully I got Mad As A Hatter just a couple of days ago and I knew I had to use it! I wanted to do something somewhat subtle but still really fun. This is China Glaze Recycle and OPI Mad As A Hatter on the tips. This glitter looks so good with greys and silvers! Are any of you going to the movie this weekend, have you already seen it? Be sure to not leave any spoilers in your comments! Is it weird that I will be on the hunt for others wearing polishes from that OPI collection? I have only seen one person wear one, and that was a lady who was wearing Absolutely Alice. Sorry about rambling lol!

    Wednesday, February 24, 2010

    Nail Art: CND Inspired!

    Hi everyone! Did you see the nails that CND did for NYFW? They were so cool! In fact after you read this, you should check out Trincess's amazing recreation of it! So I decided to do my own spin on the concept and I did a metallic light blue instead of the gold and I kept it shiny. I got so many awesome compliments from people when I was wearing this! I used China Glaze Metallic Muse and OPI Black Onyx for this mani, you like?

    Thursday, February 18, 2010

    Nail Art: Olympic-Inspired Nails

    Hi everyone! If you follow me on Twitter, then you probably already know how obsessed I am with the Olympics, so of course I had to do a mani inspired by the event! I have closely watched every Olympics since the Sydney Summer Games in 2000. In fact I even live in Salt Lake City, which hosted the 2002 Winter Olympics. It was really cool to watch the opening ceremonies this year because I now know so many people around the world through blogging. When countries would march in, I would think of people that I know in those countries and cheer, it has brought me much closer to the international aspect of the Games. I love it! Do you watch the Olympics too?

    I used OPI Alpine Snow, Art Deco Gold Glitter, OPI Sea, I Told You!, Sinful Colors Canary Yellow, OPI Black Onyx, OPI Green-wich Village, and OPI Big Apple Red. It is inspired by the Olympic flag, which I love because it contains at least one color that is on every flag around the world!

    Tuesday, February 16, 2010

    Nail Art: Mardi Gras!

    Laissez les bon temps rouler! Hi everyone, today is Mardi Gras so I am sharing not only my Mardi Gras nails, but the Mardi Gras tradition as well. I used OPI Green-wich Village, China Glaze Harmony, and Art Deco Gold Glitter.

    I am not Catholic, so I do not do Lent, but I do cheat and celebrate Mardi Gras anyway. Much of my family lives in Southern Lousiana so I am hardcore into the Mardi Gras tradition. I used to give presentations on Mardi Gras every year in French classes and such. I won't go through the whole shpeal with you all, but I will share a few fun traditions for those of you who may not know about the holiday. If you have any questions about this holiday at all, just ask, I can probably answer it.

    In case you have no idea what this holiday is about (this is the super simple short version), in the Catholic religion people go through a 40 day period called Lent in which they give something up for the 40 day period (like chocolate or ice cream or nail polish lol). Mardi Gras (Fat Tuesday) is the day before the first day of Lent (Ash Wednesday) and basically you gorge yourself on the thing that you are giving up that day. It is also a day of merriment since Lent isn't meant to be a happy time. So it is basically a day to party!


    I want to share with you my King Cake! This is a traditional cake of the Mardi Gras holiday. Everyone at the party has a slice, and in one of the slices of the cake there is a little plastic baby (it is usually hidden in the cake). My grandmother actually express shipped me this cake half-way across America from Baton Rouge Louisiana, so this is very authentic lol. The person who gets the baby hosts next year's party!


    Another tradition of Mardi Gras is the parade! I don't have any pictures for you of a parade, but basically it is a line of floats that throw candy and plastic beaded necklaces at the crowd. They play loud music and it is just so much fun! Don't worry, I don't spend my Mardi Gras on Bourbon Street! ;)


    Masks are another important part of Mardi Gras. This is me wearing my cheapy mask because I don't have my nice one at school with me. Most Mardi Gras parties used to be Masquerade Balls. Even though we really don't have those today, the tradition of wearing masks is still widely practiced.

    I don't want to make this post too long so I will stop there. If you have further questions please ask them to me, I love this holiday, it really ranks up in the top three for me! It is a really important tradition to me, which is hard in an area of the United States that does not really celebrate it, well at least not as hardcore as I do. ;)

    Also Lucy, if you are reading this; it is great to see you back! I was very excited to see your comments!